Monday 17 December 2012

Step By Step How To Do A Blue & Purple Eye

Hey I just wanted to show you all how to do a blue/purple smokey eye. It is a variation on the classic black smokey eye but I just wanted to show you how you could experiment with different colours . Take a look and have a go !!

Step 1: Apply some Blue cream eyeliner on your lid, upto the crease . I used my favourite Mememe Dewpot in Midnight Mist .


Step 2: Blend the cream eyeshadow out just softening the edges and then apply a dark blue eyeshadow over the cream and blend it out, to intensify the blue more.


Step 3: Apply any deep purple eyeshadow you have, to your crease and blend the blue and purple together.


        Step 4: Keep blending until your happy with the         blend, then take the blue cream liner under your eye and soften it out by applying the blue eyeshadow over it .


Step 5: Highlight your tear duct area with a light gold colour  and then highlight your browbone.

Apply black or blue liner to inside your eye, add lashes and that's it !!


Finished look !!!

As always, if you have any question or comments please don't hesitate to contact me. Remember to like my Facebook page "Cosmeticz Junkie" and follow me on Twitter @cosmeticzjunkie, so you can keep up to date with all the Cosmeticz Junkie's news . Thanks for reading xxx

Friday 14 December 2012

How To Do A Brown & Gold Eye Step By Step

Hey everyone I posted a picture on Facebook last week of a brown and gold eye so I thought I'd do a step by step for you all on how to create it. I went out and bought Barry M's dazzle dust in shade 53 Chocolate and Loreal infallible in 027 Goldmine, these two colours compliment each other so well. The goldmine is a really glittery light gold colour and the Chocolate is a really deep, rich brown with a lovely iridescent finish. The dazzle dust glides on so easily and blends  really well. I have to say before I start though, the camera doesn't do these colours as much justice as it should. the colours are really intense and will look so nice on a night out. I have really fallen in love with these products and I'm sure you will too, the colour payoff is incredible. The products I used are just as a guide if you have something similar to the colours then please use them.

 A tip before we start though these eyeshadows to tend to fallout when applied, so once you have applied your eyeshadow, wipe clean under your and then apply your  concealer/hightlighter & foudation, this way it will give you a really clean look to under your eye. Let begin ........


Step 1: Apply a gold base to your lid and blend to just above your crease. I used a eyeshadow pencil by Barry M in the shade No 1 Gold Cream .


Step 2: Apply the Barry M Chocolate dazzle dust to the outer corner of your eye .


Step 3: Using a soft blending brush, blend the brown   eyeshadow into the gold cream and also blend out and soften the edges. If you feel you need more brown then keep adding layers and blending it .


Step 4: Using the Gold Infallible eyehadow place it in the inner corner, I used a small flat brush as I can pick more product up with and pushed it over the cream and then blended it with clean blending brush into the brown. Keep blending both shade into each other until you are happy with the blend and look. Apply more product if needed but keep your brushes seperate so they dont get too dirty .  .


Step 5: Add some liner to the top lashline and line under and in your eyes. Blend and soften your bottom liner and add some gold to your tear duct area . Blend some of the chocolate under your eye on top of your liner. Add lashes and your done x

Remember to highlight your brown bone , I used my Mac Skinfinish in Soft & Gentle, I use it for my cheeks but works really well on my brow.


I hope you'll  have fun creating this look, if you have any questions please feel free to ask me . You can follow me on twitter @cosmeticzjunkie and please remember to like my Facebook Page at Cosmeticz Junkie .


Tuesday 11 December 2012

Barry M Lip Paint Shade 100,101 & 154


Barry M Lipstick have a excellent shade range, I thought I'd let you know about the colours I have recently purchased. I love Barry M products and feel they are really good at keeping up with trend and bring out some really good products without you having to spend alot. I love the sleek,matte black casing of these liptsticks, it doesn't look like a cheap lipstick at all. I've already blogged about Shade 154 but I've done a swatch of it so it can be compared to the other colours. I bought shade 100 Baby Pink & 101 Marshmallow, both of these shades are are very light in colour, 100 is a very pale pink and 101 is a very pale nude colour. I do find that I have to wear these lipstick with a warmer liner as they can make me look abit washed out. 101 & 100 have more of a  matte finish than shade 154, the coverage is really good but I do find this lipstick does dry on the lips after a while and can show up imperfections like chapped/dry lips, I usually apply abit of gloss over the top of it to keep it moisturised. I do love the colour but it's not a shade of lipstick I can apply straight onto the lip, I have to work at it abit to get the shade and finish which can be abit time consuming. These lipstick retail at £4.49 and are available in Boots and Superdrugs.


Shade 100

Shade 101

Shade 154


Kate Moss Lipsticks, Shade 113,101 & 03

Hi everyone I have recently heard alot about the Kate Moss Lipsticks by Rimmel, So I went out and picked a few up . There are two types of lipstick that she has released: The lasting  finish matte lipstick which comes in the red casing and are available in 5 shades , and the Lasting Finish Lipstick which come in the black casing and are available in 5 shades . I bought the two matte lipsticks in shade 113 & 101, the black cased lipsticks. I have to say for a matte lipstick they are very moisturising and would say it feels more like semi matte lipstick,the coverage is really good and theyare heavily scented, to me it smells like watermelon, which I love. The texture is really creamy and I'd say the lipstick would last upto 5 hours before reapplying. Shade 101 is a lovely warm, light pink colour and I usually wear with a same colour pink liner . Shade 113 is a really nice nude, peach colour and lovely when used with same colour liner or even blended into a darker colour liner. Shade 03 (black cased) is a lovely nude shade but a much deeper nude shade and glides on the lips effortlessly, its abit more glossier than the matte shades but to be honest there's not much difference. The 03 is a much warmer nude than the 113,so if you prefer a warmer nude than a pale nude then this is the colour for you .Overall these lipsticks are really good value for money, very moisturising and really good coverage without leaving your lips dry. They leave the lips with a nice sheen and are all really wearable day or night. These lipstick retail at £5.49 and are widely available in a number of shops. 


Shade 03

 Shade 113


Shade 101


Tuesday 4 December 2012

How To Do A Classic Black Smokey Eye Look

Hi I thought I'd share with you how to create the classic smokey black eye look. The black smokey eye can be one of the most difficult looks to master but all you need to do is make sure you take your time whilst blending. Your lash line should be the darkest part and the colour should gradually fade out . Make sure you have a couple of blending brushes and that they are clean because brushes with too much product on them will give you panda eyes!!. Believe it or not but this look only uses two colours. Once you have mastered this look you can really experiment with different colours, i.e, you could do a dark purple to light.  I will do a pictured step by step for you to follow, so lets get ready to get smoked out !!!

Step 1: Prime your eyelids with whatever primer you use, this will help the colour to stay put . The reason we use primer is because the eyelid is one of the thinnest layer of skins on our body and therefore can get oily, the primer act as a barrier and allows the colour stick and gives it longer staying power.

Step 2: With a black cream or gel liner, apply it upto your crease, it doesn't have to be neat at tthis point as we will blend it out after .


Step 3: With a soft brush blend out the base you have just applied, if you find it has dried a little and the product wont move just keep working it with the brush as the heat from the brush will eventuallly help it move (be patient ). Add more cream/gel if you feel it has gone too patchy or has gone to dry.


Step 4: Line your bottom lashline with you gel liner and with a small brush sweep along the eye, upward just above your crease, this will create a nice line and shape for your eye.


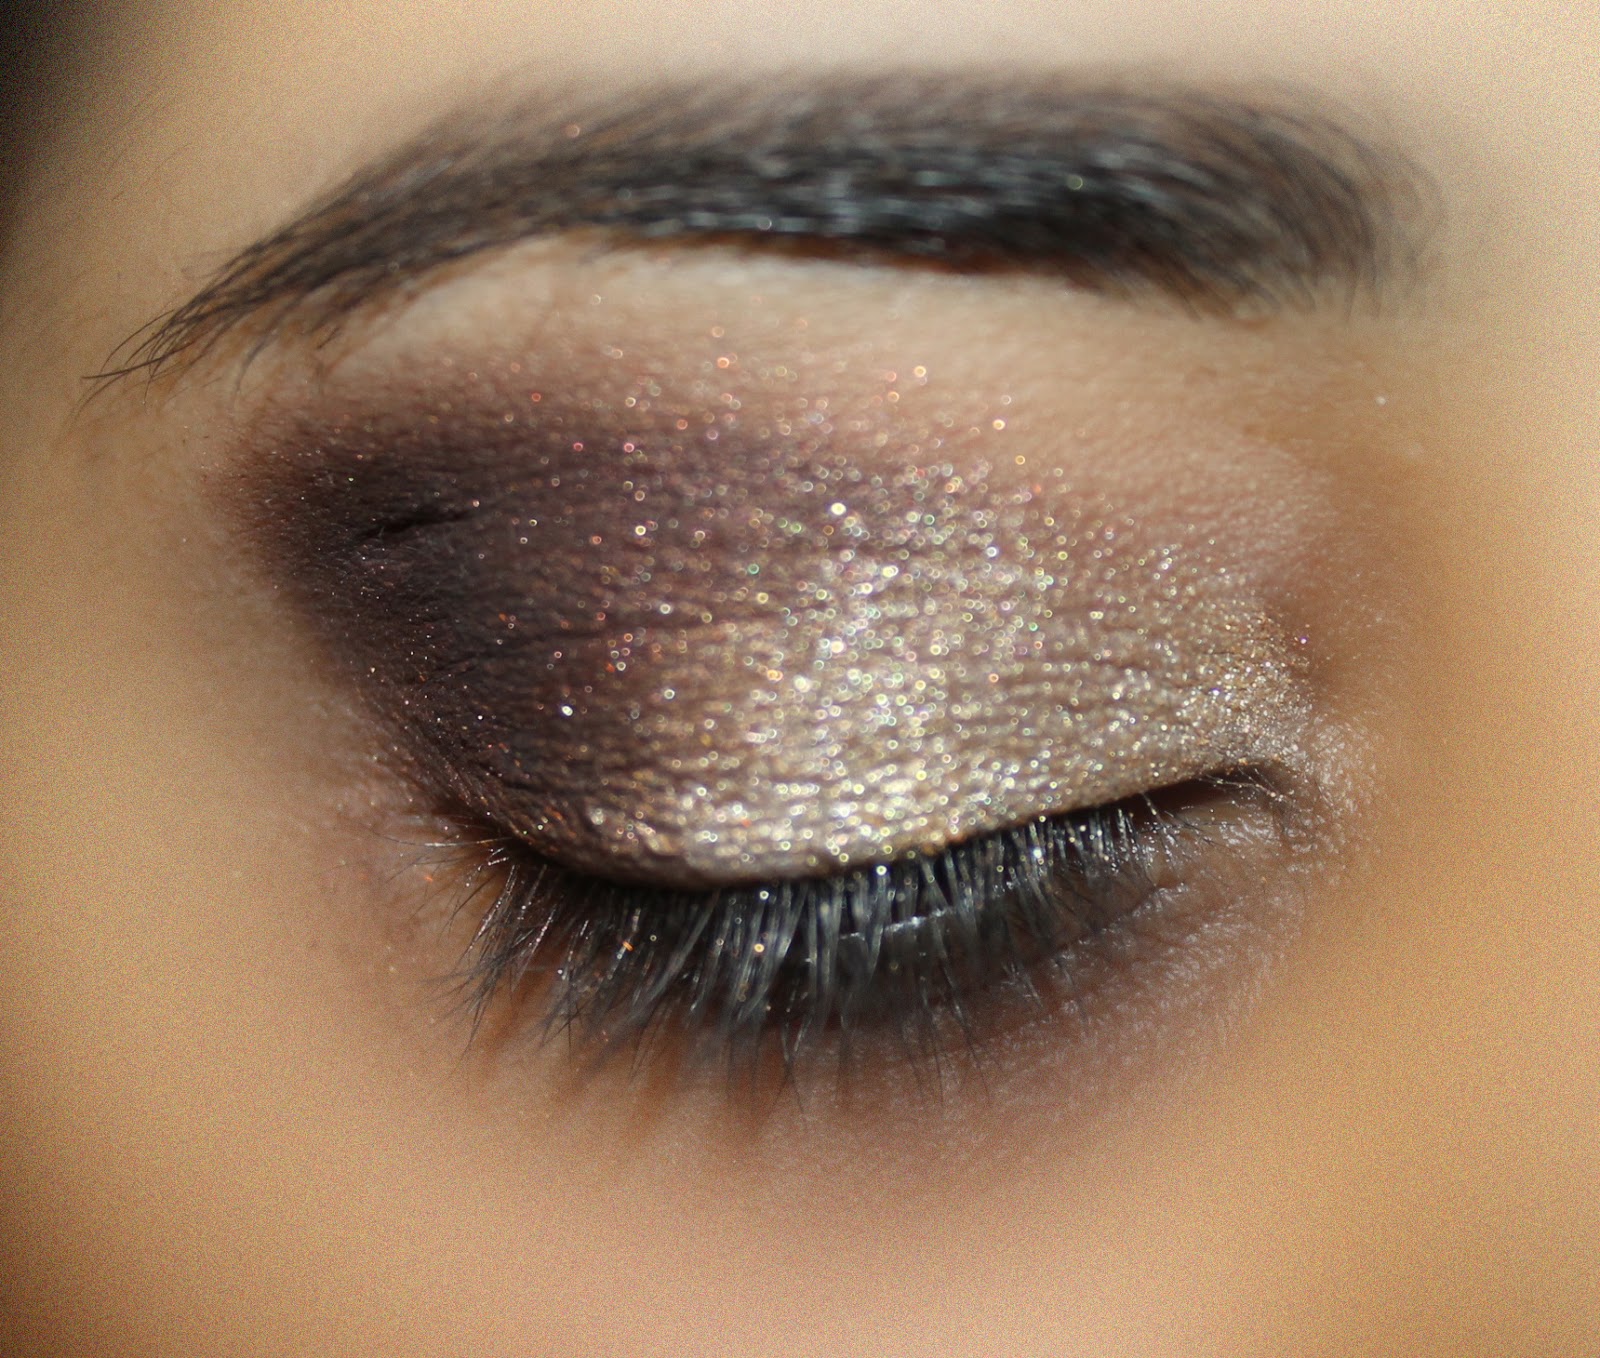
Step 5 : With a matte black eyeshadow sweep over   your base and fill in the the gap created in step 4. Blend  the eyeshadow out into the crease .


Step 6 : With a brown/orange shade, I actually used my Mac Mineralize Skinfinish Natural powder Shade: Dark (which I normally use for contouring my face) but any colour you have similar will be fine. Blend this colour into the crease and into your black eyeshadow. Use separate brushes for each eyeshadow and keep working them into each other
a little at a time .


Mac Skinfinish Natural : Dark, which I normally use as contouring powder.

Step 7: Keep working the two colours and blending it until the colours have both soflty mixed together. Hightlight your brow bone with any light or highlighter shadow you . Line your waterlines, apply mascara to the top and bottom lashes and add
lashes to set the look off .


I hope this has helped you get started with the smokey eye look. This look will make a statement when entering any room or perfect on a night out in town. Give this sexy, sultry look ago and you'll definitely get noticed . I appreciate any comments and feedback. Remember to like my facebook page Cosmeticz Junkie and also you can keep up to date with my blog posts on twitter @cosmeticzjunkie.